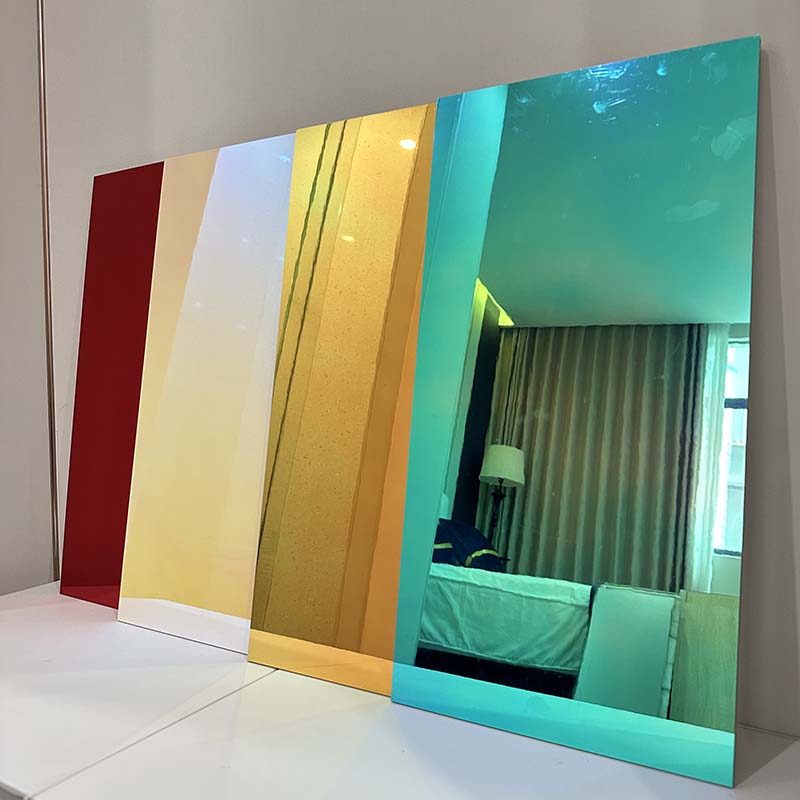
Upgrading interior spaces using a charcoal wall panel offers incredible aesthetic impact. However, long-term performance hinges entirely on substrate compatibility. Simply gluing panels to any available surface guarantees structural failure.
Whether you retrofit a finished drywall room or transform a raw concrete basement, your structural approach dictates the project's ultimate success. Unseen moisture issues or uneven framing easily ruin premium materials overnight. Ignoring these hidden risks leads directly to warped boards, peeling adhesives, and wasted investments.
This comprehensive guide details objective evaluation criteria and essential material requirements. We will cover precise implementation steps for both concrete and drywall applications. You will learn to prevent adhesive failure, manage moisture, and master the installation process for a flawless, professional finish.
Key Takeaways
Substrate defines the method: Drywall typically allows for direct adhesive application, while concrete often mandates moisture mitigation and furring strips.
Material specificity matters: Handling specialty variants like PVC Mirror Bamboo Charcoal Wall Board requires specific non-corrosive adhesives and scratch-resistant handling protocols.
Moisture is the primary failure risk: Skipping vapor barriers or using the wrong construction adhesive on below-grade concrete guarantees panel delamination.
Preparation over execution: 70% of installation time should be allocated to wall leveling, plumb testing, and layout planning to ensure seamless joints.
Evaluating Your Substrate: Assessing Feasibility and Risks
Successful wall paneling begins long before you open a tube of adhesive. You must establish a strict condition baseline. We define a "panel-ready" wall by its flatness, structural integrity, and moisture content. Walls must remain plumb within a very tight tolerance. Industry standards recommend a maximum variance of 1/8-inch over an 8-foot span. Anything exceeding this measurement requires leveling. Rigid boards cannot bend around wall bellies. They will inevitably pop off the wall if forced.
Drywall Evaluation Protocols
Drywall surfaces appear simple but hide specific challenges. You must assess paint adhesion first. High-gloss paints create a slick barrier. Peeling surfaces lack the structural strength to hold heavy boards. You must sand glossy surfaces or apply a high-quality bonding primer. This ensures a strong chemical bond between the adhesive and the wall.
Next, verify the load-bearing capacity. Use a high-quality electronic stud finder to locate the underlying framing. Mark these vertical stud lines clearly. You will need these backup mechanical fastening points. Relying solely on drywall paper for heavy panel adhesion often results in torn drywall and falling panels.
Concrete Evaluation Risks
Concrete presents a high-risk scenario. You must perform a calcium chloride moisture test. This objective test measures moisture vapor emission rates. You must prove the concrete is thoroughly dry before applying any adhesive. Trapped moisture destroys adhesive bonds over time.
You must also inspect the concrete for efflorescence. Efflorescence appears as white, powdery salt deposits on the wall surface. These salt deposits indicate active moisture intrusion. Water travels through the porous concrete, leaves the salt behind, and evaporates. Direct-glue bonds will fail rapidly under these conditions.
Your success criteria require a structurally sound, perfectly flat, and completely dry surface. This surface must support the heavy weight of the boards without long-term warping.
Procurement: Essential Tools and Adhesives Shortlist
Choosing the correct materials prevents catastrophic installation failures. Your procurement phase requires strict attention to chemical compatibility. Using the wrong construction adhesive will melt synthetic finishes or bleed through delicate surfaces.
Adhesive Selection Requirements
Your adhesive choice depends entirely on the substrate and the panel type. Porous concrete requires different chemical properties than smooth drywall.
Adhesive Type
Primary Substrate Use
Panel Compatibility
Key Characteristics
Polyurethane Construction Adhesive
Porous Concrete, Wood Furring
Standard Charcoal Core
High grab, expands slightly, requires dry conditions.
Silicone-Based / Neutral Cure
Painted Drywall, Smooth Finishes
PVC Mirror Variants
Non-corrosive, prevents chemical burning or mirror bleed-through.
Heavy-Duty Masonry Adhesive
Cured Above-Grade Concrete
Thick Wall Boards
Extreme initial tack, resists moderate temperature shifts.
Mechanical fasteners provide critical temporary support while adhesives cure. For drywall installations, procure an 18-gauge brad nailer. Brad nails easily penetrate the board's tongue and secure it directly into the wooden studs behind the drywall.
For concrete furring strip installations, you need heavy-duty masonry anchors. Tapcon screws pair perfectly with pressure-treated lumber. They provide a rigid, moisture-resistant grid system.
Cutting and Sizing Tools
Precision cuts define a professional aesthetic. You should use fine-tooth track saws for long, straight rips. Standard circular saws work well, provided you equip them properly. Always use an 80-tooth or higher carbide blade. Coarse blades chip the delicate charcoal veneer and splinter PVC edges.
Safety compliance remains non-negotiable. Wear P100 respirators when cutting these boards. Cutting silica-adjacent or PVC materials generates hazardous fine dust. Furthermore, ensure your chosen adhesives meet local indoor air quality standards and low-VOC regulations.
Step-by-Step: Installing a Charcoal Wall Panel on Drywall
Drywall provides the most straightforward installation path. The smooth, flat nature of drywall allows for direct adhesive application. You must maintain strict scaling and layout practices to ensure symmetry.
Wall Prep & Layout: Begin by wiping down the walls using a damp microfiber cloth. Lingering drywall dust ruins adhesive bonds. Measure the room horizontally to find the exact center. Snap a vertical chalk line at this center point. Starting from the center ensures symmetrical panel cuts at both corners. Symmetrical corners look professional and intentional.
Adhesive Application: Turn the panel face down on a clean surface. Apply your chosen adhesive. Use either an "S-pattern" or a "perimeter-and-dot" method. Leave a strict 1-inch clearance from all outer edges. This empty border prevents messy adhesive squeeze-out when you press the board against the wall.
Placement & Mechanical Securing: Lift the board into position alongside your chalk line. Press it firmly against the drywall. Use a clean rubber roller or your hands to ensure uniform contact. Shoot 18-gauge brad nails into the concealed tongue groove. Aim these nails directly into your pre-marked stud locations. The nails hold the board tight while the adhesive cures over the next 24 hours.
Managing Seams: Account for thermal expansion. Homes experience significant temperature fluctuations. Leave a 1/16-inch gap between rigid boards if the manufacturer recommends it. Fill these expansion gaps using color-matched caulk or conceal them using dedicated metallic trim pieces.
Step-by-Step: Installing Charcoal Wall Panels on Concrete
Concrete installations present complex structural challenges. You must choose between two distinct methods based on the room's grade level and moisture conditions. Never guess the moisture level. Always trust your calcium chloride test results.
The Direct-Glue Method (Above-Grade Only)
You can use the direct-glue method only on specific surfaces. The concrete must be perfectly flat, fully cured, and situated above grade. Direct gluing requires premium heavy-duty masonry adhesive. You will also need temporary bracing. Concrete lacks the porosity for instant tack. You must build temporary shoring using scrap wood to hold the boards against the concrete while the heavy glue sets.
The Furring Strip / Batten Method (Best Practice & Below-Grade)
Industry experts recommend the furring strip method for almost all concrete scenarios. It creates a physical air gap. This gap manages moisture and entirely bypasses uneven concrete walls.
Install the Moisture Barrier: Apply a liquid-applied vapor barrier directly to the concrete. Alternatively, hang thick poly sheeting. This barrier stops hidden basement moisture from reaching the wood or the decorative boards.
Install the Grid: Procure 1x2 or 1x3 pressure-treated wood furring strips. Anchor these strips vertically every 16 inches along the wall. Use a hammer drill and Tapcon masonry screws. Drive the screws deep into the concrete.
Level the Grid: Concrete walls are rarely plumb. Place a 6-foot spirit level vertically against the furring strips. Slide composite shims behind the wood strips wherever you find a gap. Drive a screw through the strip and the shim into the wall. You now have a perfectly plumb wooden grid.
Panel Attachment: Run a continuous bead of polyurethane panel adhesive down the face of each plumb wood strip. Press your board against the strips. Secure the board immediately using your 18-gauge brad nailer. The air gap behind the board allows the structure to breathe freely.
Specialty finishes elevate room aesthetics but introduce unique handling challenges. Bamboo charcoal cores offer exceptional structural durability. However, high-gloss or mirrored PVC faces remain highly susceptible to micro-scratching during the installation process. You must handle them like fragile glass.
Surface Vulnerability
Mirrored finishes show every imperfection. Sliding boards against each other during transport causes permanent scuff marks. You must carry these boards face-to-face or back-to-back. Never drag a tool across the surface. Once scratched, you cannot buff or repair a mirrored PVC finish. The damaged board becomes total waste.
Protective Film Protocol
Manufacturers ship these specialty boards covered in a thin, clear protective plastic film. You must leave this factory protective film intact. Keep it on during 100% of the measuring, cutting, routing, and gluing processes. Only peel the film back slightly at the very edges to allow panels to interlock. Remove the main body film only after the entire wall is completely finished and the site is clean.
Edge Treatments
Raw cuts on mirrored PVC look jagged and unprofessional. You cannot sand these edges easily. Sanding melts the PVC and chips the mirror backing. You must use dedicated architectural trims. Install J-channels around the perimeter. Use sleek aluminum edge trims for outside corners. These metal trims hide the raw cuts and frame the mirrored boards beautifully.
Cost vs. Risk: Should You DIY or Hire a Professional?
Evaluating your personal skill level against the project's complexity saves money and prevents frustration. Some installations suit weekend warriors perfectly. Others demand professional carpentry skills.
DIY Feasibility
Standard drywall applications in dry, perfectly square rooms offer high DIY feasibility. If you possess moderate carpentry skills, a brad nailer, and a track saw, you can execute this flawlessly. The direct-glue method on drywall forgives minor speed errors, provided you snap accurate chalk lines.
When to Hire a Pro
Certain conditions escalate the project risk immediately. You should hire a professional contractor if you encounter any of the following scenarios:
Uneven or wet concrete basements requiring extensive framing, shimming, and vapor barriers.
High-ceiling commercial installations requiring professional scaffolding and multiple hands.
Complex architectural cutouts. Cutting perfect rectangles for multiple outlets, HVAC vents, or windows into highly rigid boards requires advanced routing skills.
Project Evaluation Chart
Project Variable
DIY Suitability
Professional Requirement
Substrate Material
Smooth, painted drywall.
Uneven concrete, crumbling plaster.
Moisture Levels
Above-grade, climate-controlled rooms.
Below-grade basements, high humidity zones.
Room Geometry
Simple squares, minimal cutouts.
Vaulted ceilings, numerous windows/doors.
Panel Type
Standard matte finishes.
Highly reflective, scratch-prone mirror finishes.
Your next steps involve careful planning. Order physical samples first. Test these samples against your specific wall's lighting conditions. Measure your total square footage carefully. Always add a strict 10% overage to account for waste, mistakes, and complex corner cuts. Finally, verify your substrate moisture levels before purchasing adhesives.
Conclusion
Successfully upgrading your interior relies entirely on recognizing your wall's limitations. Substrate dictates the installation method. Drywall favors rapid, direct-glue applications. Concrete demands strict moisture-awareness, vapor barriers, and physical wood framing.
Never compromise on your adhesive quality. Ensure you select the exact chemical formulation required for your specific board type. You must never skip the crucial leveling checks. A plumb wall guarantees seamless joints and a stunning final appearance. Taking shortcuts during wall preparation guarantees visible warping.
You now possess the foundational knowledge to execute this upgrade. Browse detailed specifications, calculate your total material requirements, or speak directly to a technical sales representative regarding your specific concrete conditions to begin your renovation journey today.
FAQ
Q: Can I install charcoal wall panels directly over painted drywall?
A: Yes, you can install them over painted drywall. However, the paint must be fully adhered and clean. You should lightly scuff high-gloss paint using fine sandpaper. This scuffing creates a microscopic texture. It allows the construction adhesive to grip the wall effectively and form a permanent chemical bond.
Q: Do I need a vapor barrier if my concrete wall feels dry?
A: Yes. Concrete moisture levels fluctuate seasonally based on groundwater pressure. A wall feeling dry in summer might sweat in winter. You must perform a calcium chloride test. Installing a vapor barrier is mandatory for all below-grade basement applications to prevent hidden mold and adhesive failure.
Q: Are PVC Mirror Bamboo Charcoal Wall Boards waterproof?
A: The bamboo charcoal core and the PVC face are highly water-resistant. They easily withstand surface splashes. However, prolonged moisture trapped behind the panel against a concrete wall will destroy the adhesive bond. Trapped moisture breeds black mold, eventually ruining the installation from the inside out.
Q: How do I remove the panels later?
A: Direct adhesive installation on drywall is semi-permanent. Removing glued boards will tear the drywall paper, requiring extensive patching and skimming later. Conversely, installations utilizing the wood furring strip method on concrete are much easier to dismantle. You simply pry the boards off the wooden grid.
The company was established in 2018 and specializes in new environmentally friendly indoor decorative materials such as SPC flooring, WPC flooring, carbon crystal flooring, wood veneer panels, and carbon crystal wall panels.